Where-To-Do : Android (Part 1)
I’ve been meaning to do an Android project for quite some time, but because of Uni work and exams I haven’t had the time, but since break I figured I could make a start on a project. I also remember how hard I found it to make my own app when I first started using Android, so here it is for anyone interested, I start to finish app covering the EVERY part of app development. The app I’m going to make is nothing too exciting, it’s just a simple to-do list that will let you sort the to-do’s in different orders and select a view, all the to-do’s or view to-do’s in groups of weeks or days.
I was tempted to do a screencast but decided not to because I don’t think it would offer any real advantage to explaining through text and images, but if you’d like the rest of series to be a screencast I’d be happy to give it a shot.
DISCLAIMER: Most of the techniques I use are from what I’ve gathered from the internet, books and may not be the best approach, so remember “Do as I say, not as I do” and we’ll be all ok.
In my mind their are 2 sides to any program, the GUI and the back-end. The more these 2 things can be kept apart the better, that way what we change on either side, hopefully, won’t affect the other side. So considering this is the first part of this set of tutorials I figured I start of with some friendly GUI stuff to get you all thinking just about what you may want your app to look like and realise you aren’t stuck to the Android default UI.
For this part of the series I’m going to show you all how to make a custom button, and this will show you:
- What to consider when creating simple interfaces
- Illustrate how 9-Patch PNG’s work
- How to create custom buttons
So I played around in GIMP (An open source version of Photoshop) to mock up roughly what I want my app to look like and this is what I came up with.

Nothing to exciting but looks OK and is a bit of a change to the Android default look/feel. Now I’m pretty sure there will be changes as this project goes on, but for now I think we are good to move ahead.
One thing I learnt from speaking to people heavily involved in Android development, is that you should always do your best to include the default UI (User-Interface) features. So a simple example of this is, by default when you add a number of buttons to a layout, and press buttons on the D-Pad of the emulator, the buttons will highlight orange for which one your on.
So we need to consider how to display this information. So attempt 2 of the buttons on the screen:
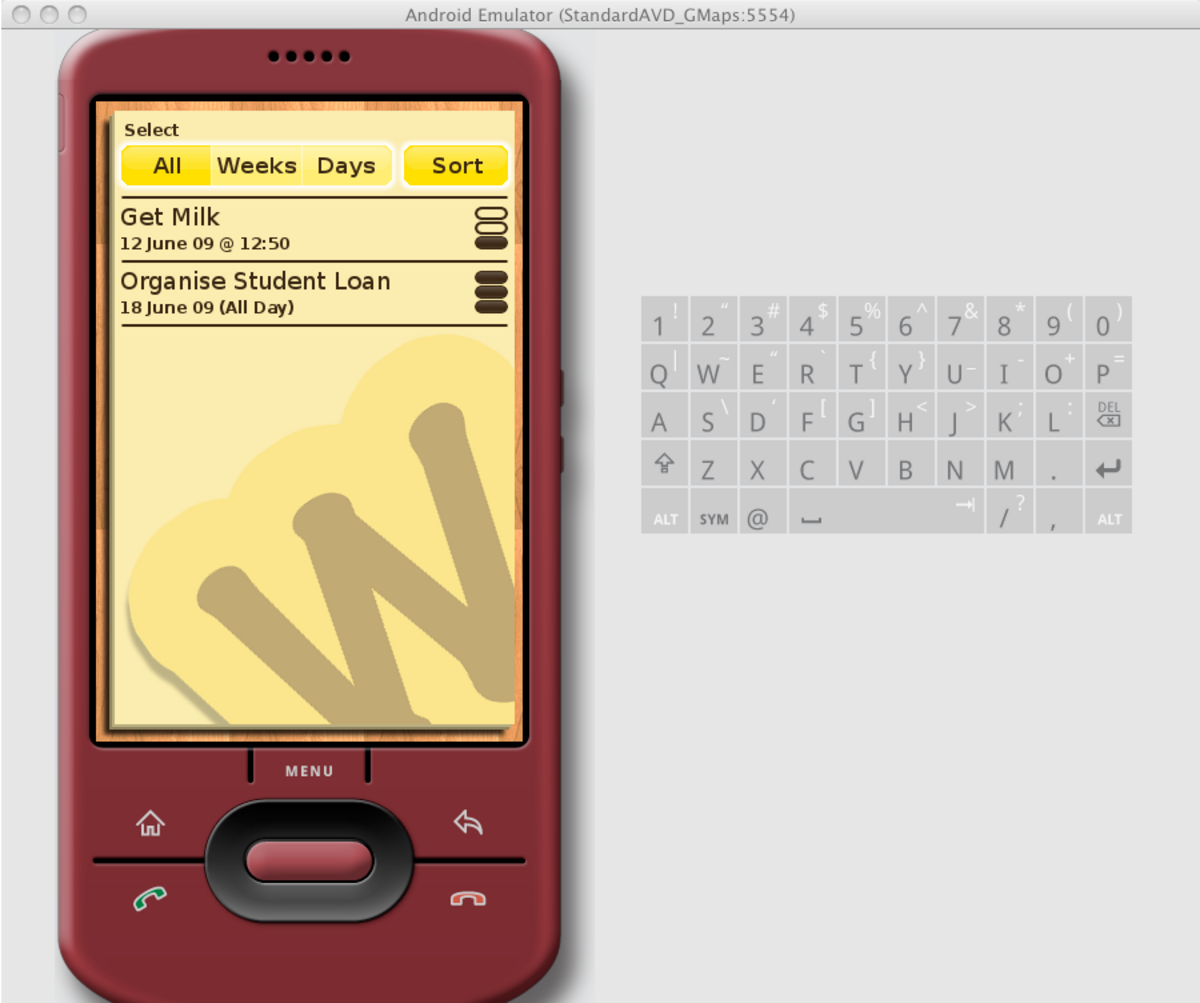
Now the new version has a number of things changed on the buttons, firstly the white blurred background behind the buttons represent where the focus is on the screen. I’m not sure how clear the white blur is but I can change it later on. You’ll also notice the ‘All’ and ‘Sort’ buttons are a deeper yellow colour. This is to represent 2 different things, firstly in the example of the ‘All’, ‘Week’ and ‘Day’ buttons, I want these to display which button is currently selected. In this instance the ‘All’ button is pressed (Show all To-Do’s). For the ‘Sort’ button this is something that you probably haven’t thought of, but when you press a button on a touch screen, they tend to change colour or move slightly, this is to give you some visual feedback that the click has been acknowledged. Now as silly as this sounds, it feels really wrong if there is no feedback on a button press. If you don’t believe me, build this app without the changing image, put it on a physical Android device and try it. You’ll be begging for it after one click.
So we have all of this stuff, now I need to make my buttons so I can add them into my Android Project. I could use this image to cut out the buttons with the text on them, but what if I later decide to change the text? So thats no good. Ok cut up the images but leave the text out, this means though I’m now tied down to that particular size button, if the text is too long it’ll go outside the app. Nope no good, this is where the simplicity of 9-patch PNG’s comes to save the day.
Now to explain why I’m cutting up the images the way I do, I need to explain how 9-patch PNG’s work, but to explain that, it would be easiest to just give you an example. So here’s the images cut up to be changed to 9-patch PNG’s and then you’ll work out why the images are cut up as they are.
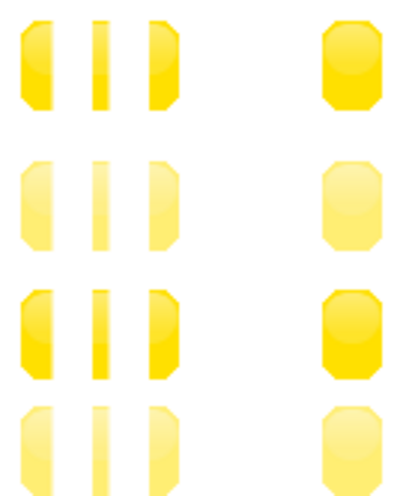
Right now they’re cut up into 4 different chunk’s and each chunk has 4 states (Selected focused, unselected focused, selected unfocused, unselected unfocused).
So when you download the Android SDK it comes with a set of tools
You have a new window open up:

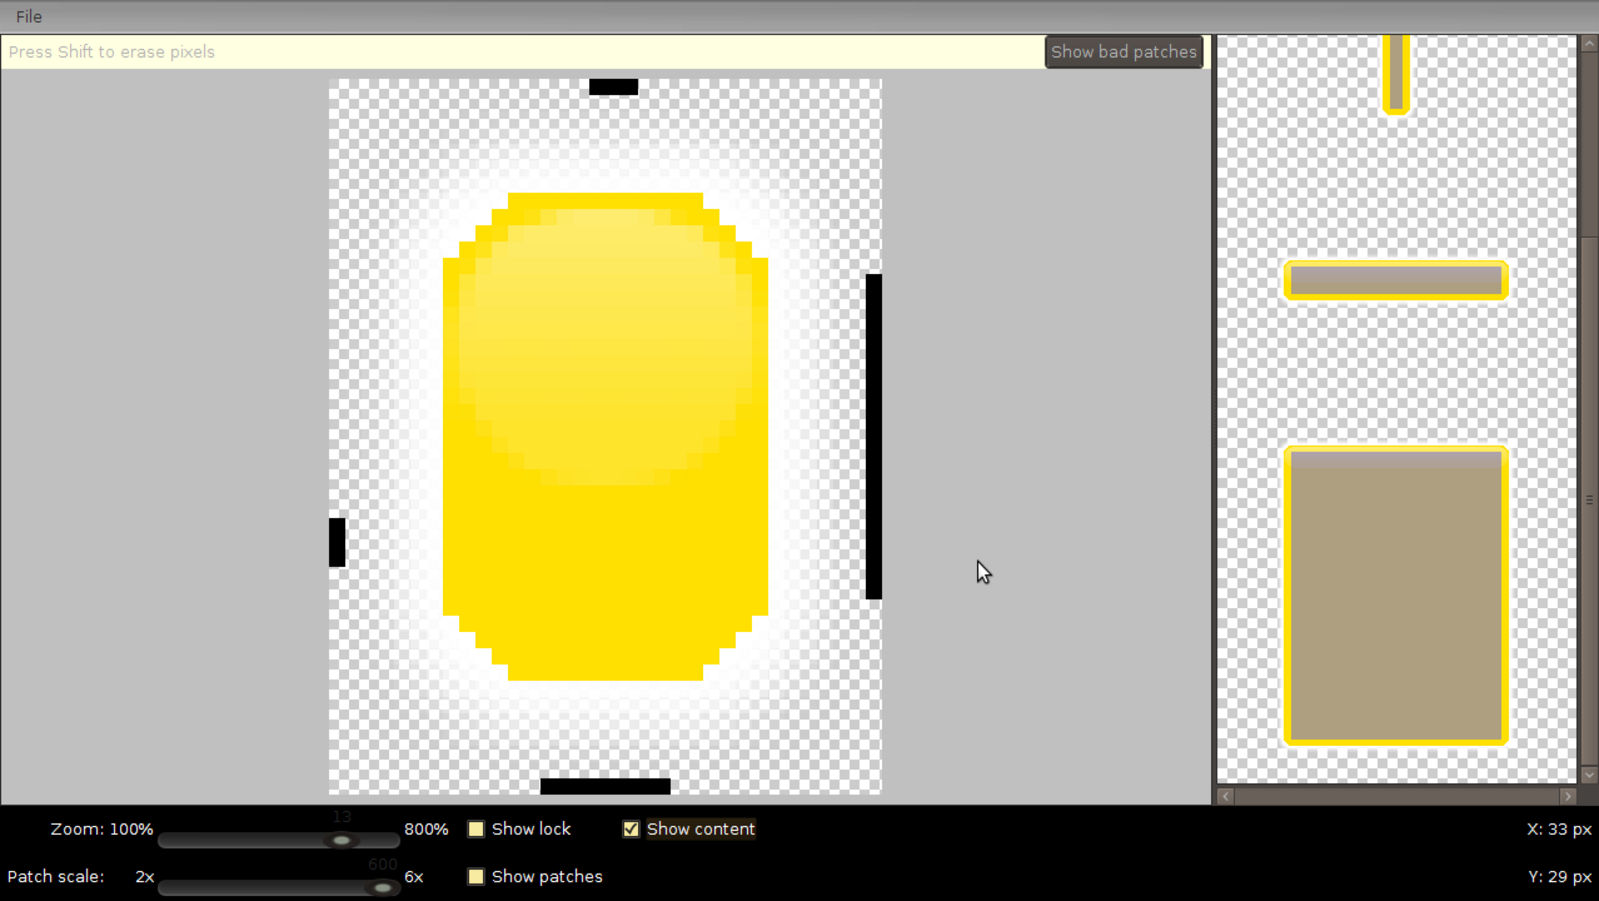
Now go to File > Open 9-Patch and open one of your button images. This will load up your image into the draw9patch tool. Now the essence to this tool is simple, on the top side and left side, you draw which pixels can be stretched (or repeated). So draw on the pixels you want to be stretched, this can only be done on the one pixel border that is added to the edge of the image. Once you’ve done this it will show you how it looks when stretched in the right hand side of the tool.
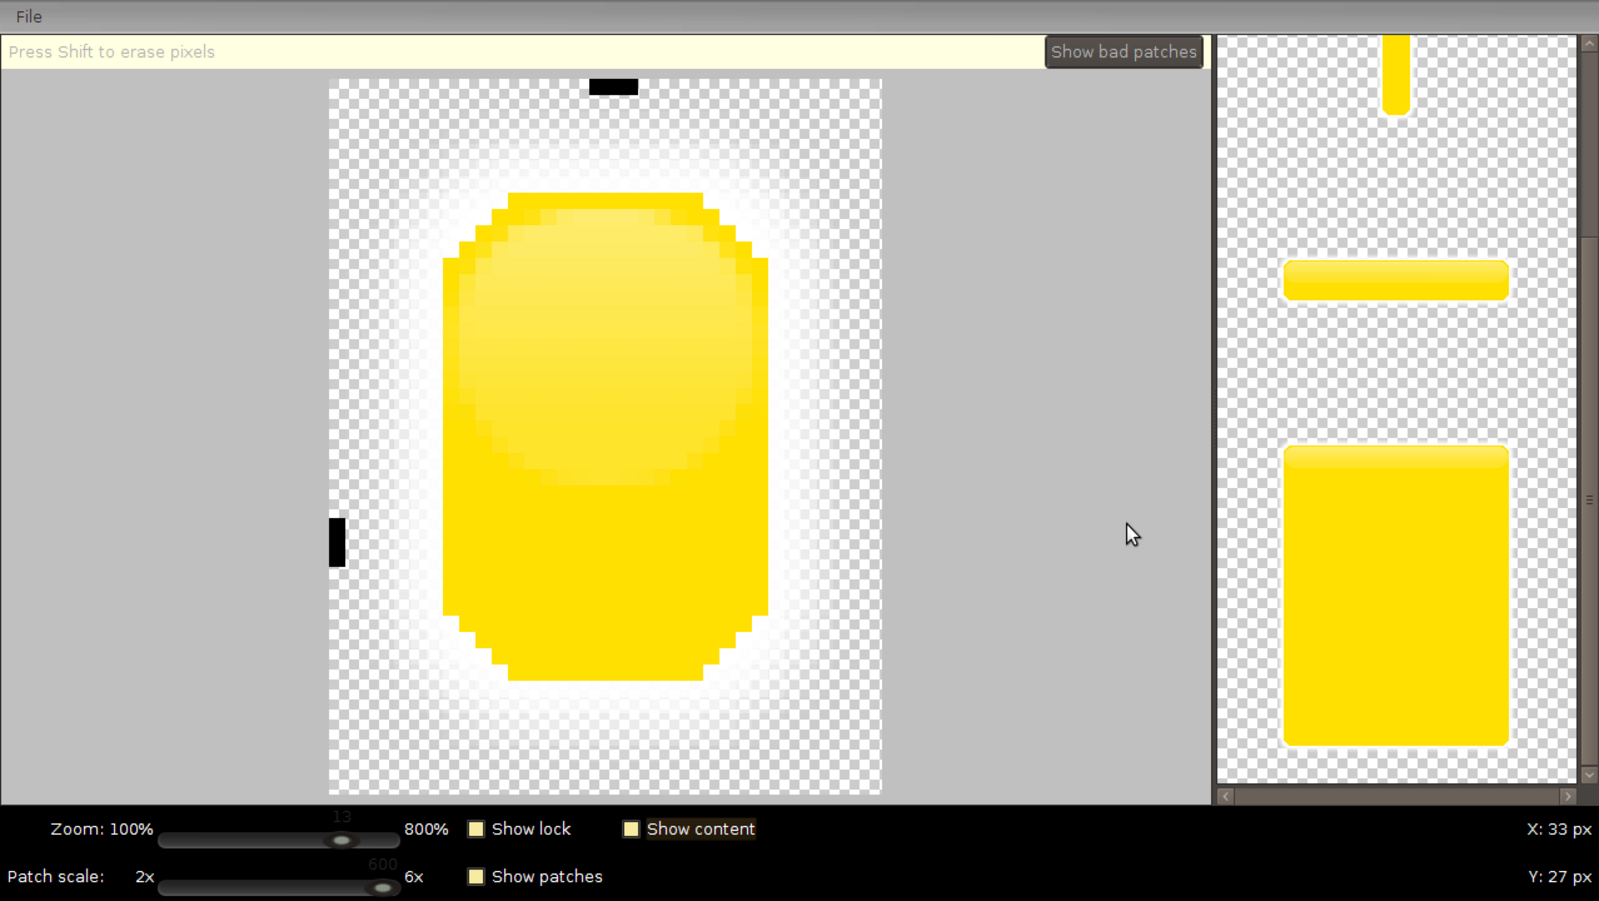
There you go a fully scaling button, but is anyone wondering what the right hand and bottom border pixels are for yet? Well these are for defining where the content of the button can go - so in this case where our text is allowed to go, this prevents it from extending outside the button.
So click on “Show content” check box and add in your content borders and you’ll see where the content will sit in the button
One thing to note about 9-patch PNG’s is that they are basically PNG’s but by labelling .9.png files Android expects to find a 1px border of black to define the extra info. So you can use the 9 patch tool for one state of the button and then just use your graphics program to make the rest (Which I personally find a bit quicker). So repeat the process until you have a full range of button states in .9.png format.
Finally we get to stick it into our Android project.
So create a new project or open up your existing project (I find it easiest to manage all of my code in eclipse so I will refer to many things in eclipse but they should be easy instructions to swap over if your coding outside of an IDE).
Now move all your images over to the res/drawable/ folder in your project folder (So go to your eclipse workspace folder, find your project folder, in there you’ll find res/drawable). Quite often after doing this eclipse won’t realise the new files have been put in the folder so just right click on the project in eclipse and select refresh. So we have our new buttons in the res folder, how do I add them?
Android has a very clever way of defining the states of a button and therefore what image we should show, so in the res/drawable/ folder create a new file and give name it
Now open the new file and select the tab with the file name, instead of viewing the Resources tab.
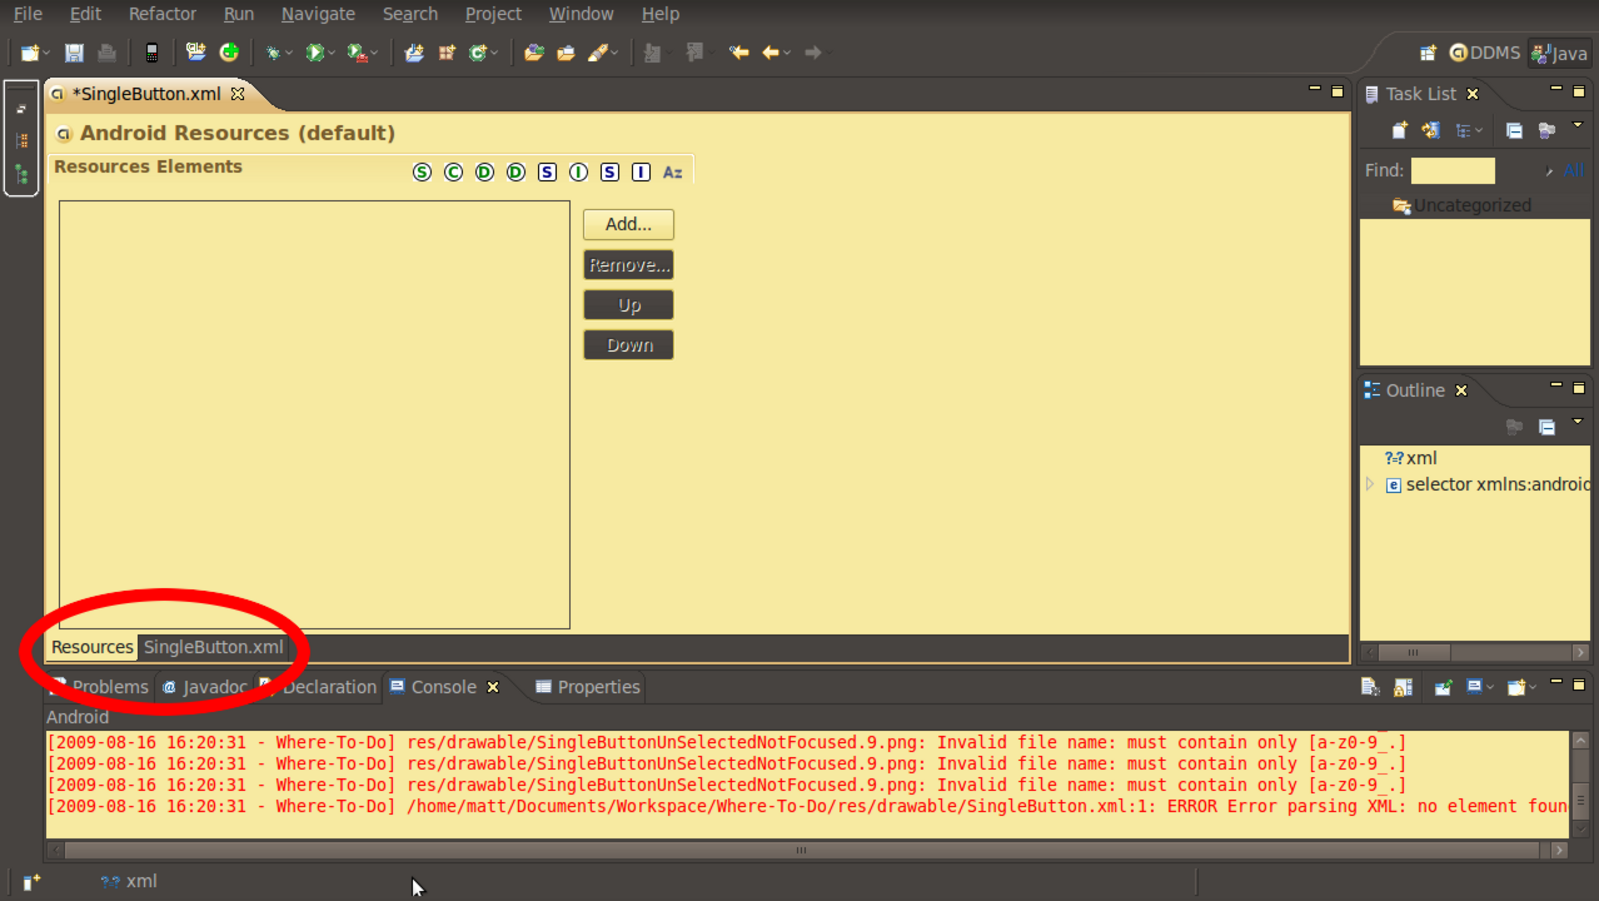
Notice how I chose a name with Capitals and errors were caused?? :-P
Now add in the following code, but changing the android:drawable=”@drawable/
Now with every bit of luck you should have everything set up to add your new button. Go to a layout in your res/layout folder and add a button to it. Then click on the button and under it’s properties change the background of it to the name of the xml file you just created (singlebutton) in my case.

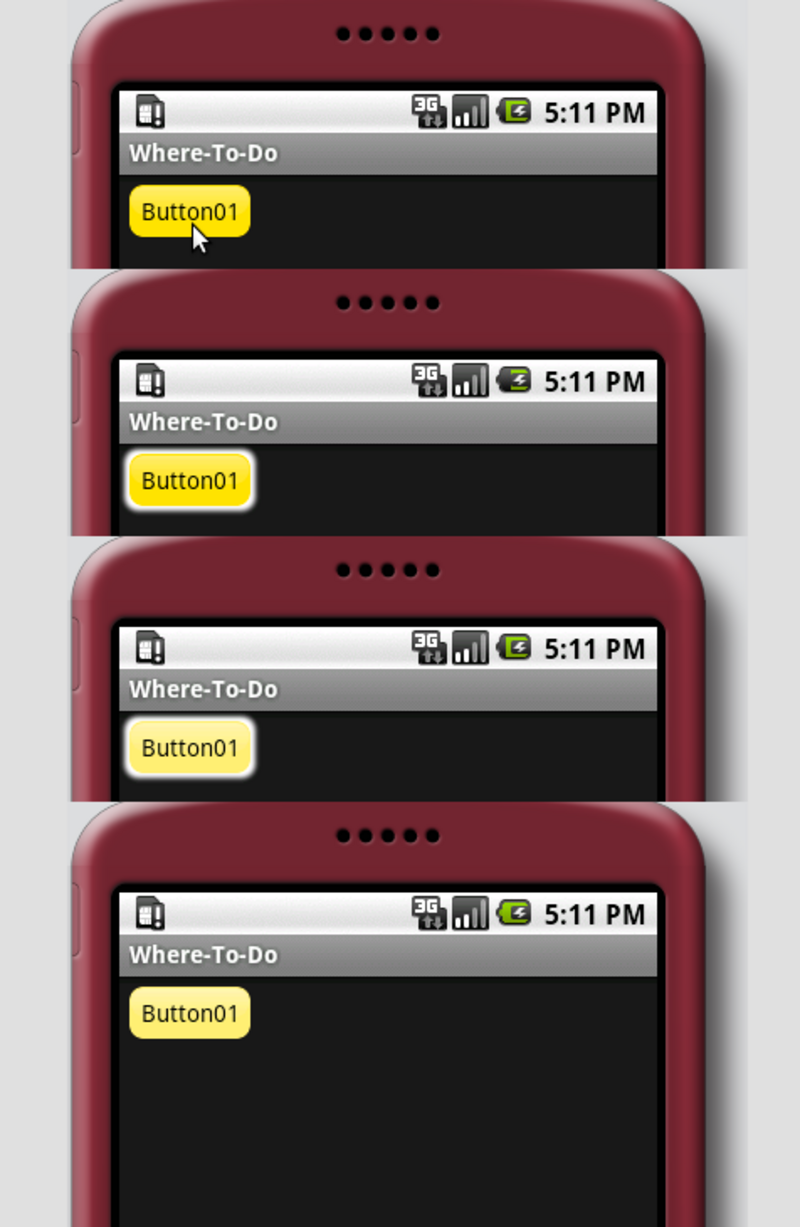
Now start up your emulator and you should have a button which changes states with you background which stretches depending on the content of the button or width you set.
Done! Welcome to the world of customising your app from start to finish. Now this has been quite a bit of effort but the same principles can be applied to other widgets, just have a play.
Anyway for those of you interested check out the StateListDrawable page for more options to use for the button.
Any comments about this post or what sort of things I should change about the style of posting please let me know.
Orig. Photo: https://flic.kr/p/2AcAfi
Found an issue?
All my posts are available to edit on GitHub, any fix is greatly appreciated!