
Continuous Deployment with AWS and GitHub Actions
After using Netlify and Firebase to host different sites I reached a point where I was hitting limits on the free tiers they offer.
To reduce costs I ended up switching to AWS with GitHub actions for continuous deployment.
Overall the process was easier than I expected.
Hosting on AWS
I’m pretty new to AWS and found this video to be the most helpful to get me started and more familiar with S3 and Cloudfront.

The approach is to upload your site to an S3 Bucket to store and host your files and configure a Cloudfront distribution to be a CDN to serve and cache files from your bucket.
After uploading my files and getting Cloudfront to serve from S3 I realized
that Cloudfront was unable to serve index.html files from from a directory,
it can only serve index.html for the home page.
This was a problem for me since Hugo will create index
pages in directories to create clean URLs.
For example, it would create /blog/2019/09/post-slug/index.html and use the
URL /blog/2019/08/post-slug/ as a link to this page. There are two options to fix this.
Change the default behavior of Hugo by adding uglyURLs: true to the config, causing Hugo to create /blog/2019/08/post-slug.html instead of a nested index.html file.
The second option is to turn on the S3 bucket static site property and configure Cloudfront’s origin to be the S3 buckets static URL instead of the S3 bucket directly (which uses the Rest API behind the scenes).
Custom domains
Adding a custom domain is easy enough and it doesn’t require Route 53, despite how it seems in all of the AWS docs.
You need to create a certificate for you domain using
AWS’s Certificate Manager,
just ensure you are creating certificates in the us-east-1 (N Virginia) region as this
is the only region Cloudfront can read certificates from.
I ended up created a certificate for both gauntface.com and *gauntface.com so it
could be used for the naked domain and any subdomains.
I went through the DNS flow to verify a couple of domains and it took around 5 - 15 minutes. Once the certificates were issued I could add my domain to the Alternate Domain Names in my Cloudfront distribution and select the appropriate certificate under Custom SSL Certificate.
Naked and www domains
After Cloudfront was set up to serve my site as www.gauntface.com, I wanted to set up redirects for the naked domain (i.e. gauntface.com -> www.gauntface.com).
The naked domain required a seperate S3 Bucket and Cloudfront distribution.
Both gauntface.com and www.gauntface.com used an S3 bucket with the Static website
hosting property turned on. This gave the bucket a URL that you can
use to access the site. When creating the Cloudfront distribution the Origin Domain Name needs to be set to the
URL of the buckets Static website hosting property. This causes Cloudfront to make
network requests to the S3 Bucket’s static site, which will respond with the files and serves index.html files for directories.
For the naked domain I created an empty S3 Bucket and the static site property was configured with Redirect requests meaning Cloudfront will respond to requests with the redirect.
With all of the above set up, I had a working site that was easy to update from the command line. The next step was to set up continuous deployment so the site would deploy updates as changes were made.
Continuous Deployment with GitHub Actions
GitHub actions were the obvious choice for this since I host all my projects on GitHub and I am already on the pro plan giving plenty of action minutes.
Build on PRs
On a Pull Request I want to know that the site builds before it’s merged which
was achieved with the following GitHub Action workflow (saved to .github/workflows/build-and-test.yml in my repo):
name: Build and Test

on: push

jobs:
  build-and-test:
    runs-on: ubuntu-latest
    steps:

    - name: Setup Hugo
      uses: peaceiris/actions-hugo@v2
      with:
        hugo-version: '0.68.3'

    - uses: actions/checkout@v2

    - name: Install
      run: npm install

    - name: Build
      run: npm run build
These steps do the following:
name: Setup Hugo ↵ uses: peaceiris/actions-hugo@v2- My site is using Hugo for a static site generator and this action will retrieve and configure a specific version of hugo.
uses: actions/checkout@v2- This is a GitHub action that checks out the repo the action is running against.
name: Install ↵ run: npm install- I’m using gulp to manage my build process for the site, including calling out to Hugo, so I need to install it’s dependencies from NPM.
name: Build ↵ run: npm build- Final step is to build my site by running an NPM run script.
These steps are for specific to my build process and you’ll need to adjust this for your sites needs, but it demonstrates how you can configure a chain of steps.
As pull requests are opened, this action will run and ensures that my site can install dependencies and build.
You can find the workflows for my site here.
Deploy the Master Branch
Renovate raises and merges PRs for my site whenever a dependency is updated and I wanted to make it easy to publish this changes on a regular basis.
The end result was using a GitHub action to publish these changes once a week.
The full workflow is:
name: Publish

# Run every Sunday @ 13:30 UTC => 6:30 PST
on:
  schedule:
    - cron:  '30 13 * * 0'

jobs:
  publish:
    runs-on: ubuntu-18.04
    steps:

      - name: Setup Hugo
        uses: peaceiris/actions-hugo@v2
        with:
          hugo-version: '0.68.3'

      - uses: actions/checkout@v2
        with:
          ref: master

      - name: Install
        run: npm install

      - name: Build
        run: npm run build

      - name: Configure AWS Credentials
        uses: aws-actions/configure-aws-credentials@v1
        with:
          aws-access-key-id: ${{ secrets.AWS_ACCESS_KEY_ID }}
          aws-secret-access-key: ${{ secrets.AWS_SECRET_ACCESS_KEY }}
          aws-region: us-west-1

      - name: Upload to S3
        run: aws s3 sync ./public/ s3://www.gauntface.com/ --delete --acl public-read
The key differences are the the start and end of the workflow.
name: Publish

# Run every Sunday @ 13:30 UTC => 6:30 PST
on:
  schedule:
    - cron:  '30 13 * * 0'
This controls when the deploy workflow will run. I run this script every Sunday morning.
Then I have the same steps as before, checkout the repo, install dependencies, build the site followed by two new steps:
- name: Configure AWS Credentials
  uses: aws-actions/configure-aws-credentials@v1
  with:
    aws-access-key-id: ${{ secrets.AWS_ACCESS_KEY_ID }}
    aws-secret-access-key: ${{ secrets.AWS_SECRET_ACCESS_KEY }}
    aws-region: us-west-1

- name: Upload to S3
  run: aws s3 sync ./public/ s3://www.gauntface.com/ --delete --acl public-read
The first step sets up the AWS CLI using the aws-actions/configure-aws-credentials@v1
action and two secrets secrets.AWS_ACCESS_KEY_ID and secrets.AWS_SECRET_ACCESS_KEY.
The secrets are the key ID and secret for the credentials for an AWS user which you can create on the AWS Identity and Access Management (IAM) console. You’ll need the user to have write access to your S3 bucket. Once create, you just need to add the key ID and secrity key your GitHub repos secrets which can be done in your repo’s Settings page.

The second step runs the the same aws s3 command that you would run from your computer
to upload files to S3.
GitHub Branch Protection
One risk with continuous deployment is that if you push a commit to master that breaks the build of your site, you will not be able to deploy changes to your site until it’s fixed.
Avoid this situation with Branch Protections to restrict pushes to the master branch.
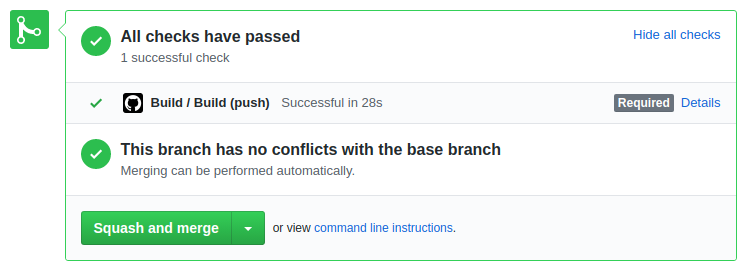
I’ve set up my repo such that I can’t push commits to master and that Pull Requests must pass the Build action before they can be merged.

Cache headers
Setting cache headers for assets can help improve the performance of your site and reduce running costs of your site.
To that end I’ve added the two following steps to add cache headers.
- name: Set Caching for some files to 24 hours
  run: |
    aws s3 cp \
    s3://www.gauntface.com/ s3://www.gauntface.com/ \
    --metadata-directive REPLACE \
    --cache-control 'max-age=86400' \
    --exclude="*" \
    --include="*.html" \
    --include="*.xml" \
    --include="*.json" \
    --include="*.svg" \
    --acl public-read \
    --recursive

- name: Set Caching for images to 360 days
  run: |
    aws s3 cp \
    s3://www.gauntface.com/ s3://www.gauntface.com/ \
    --metadata-directive REPLACE \
    --cache-control 'max-age=31104000' \
    --exclude="*" \
    --include="*.css" \
    --include="*.js" \
    --include="*.png" \
    --include="*.jpg" \
    --include="*.jpeg" \
    --include="*.gif" \
    --include="*.webp" \
    --include="*.woff" \
    --include="*.woff2" \
    --acl public-read \
    --recursive
Fin.
I would recommend anyone to give this a go if you are looking for an easy way to run a site directly on AWS.
It is missing some of the bells and whistles from Netlify, but it’s good enough for my needs and I really don’t need much.
Found an issue?
All my posts are available to edit on GitHub, any fix is greatly appreciated!